In this post tutorial i will demonstrate how to create a wordpress plugin from scratch and the essentials required before you get started.
What are Plugins?
Plugin in general is packages of code that you inject into certain software to allow for additional functionality. Therefore plugins adds flexibility by allowing to adding functionality without modifying the core system . Another advantage also that you can detach this plugin and the core system still works.
The same concept applies to wordpress plugins. Plugins in wordpress are PHP scripts that alter your website. The changes could be anything from the simplest tweak in the header to a more drastic makeover (such as changing how log-ins work, triggering emails to be sent, custom modules, and much more).
Plugin Creation Essentials
Before you create your first plugin there are some tips that you should consider to be able to create robust and maintained plugin:
1. Naming your plugin
Always use a descriptive name of what your plugin do. First you need to check that your plugin name is unique by visiting the wordpress plugins store and look if there are any plugins with this name and try to tweak it. You could also do a Google search on your proposed name. Choose a combination of words separated by – like “animate-logo”.
2. Plugin file structure
The next step is to create a PHP file with a name derived from your chosen Plugin name. For instance, if your Plugin is going to be called “Animate Logo”, you might call your PHP file animate-logo.php. your Plugin will be putting this PHP file into the WordPress Plugins directory in their installation usually wp-content/plugins/ – so no two Plugins in that directory can have the same PHP file name.
Also your Plugin filename should also be unique so that your Plugin will not conflict with another in the Plugin Repository. As a rule of thumb try to use your company as a prefix to the file name for example mycompanyname-animate-logo.php.
Your WordPress Plugin must have at least one PHP file; this is the main file that bootstrap the plugin. it could also contain JavaScript files, CSS files, image files and language files.
When creating complex functionality, splitting your plugin into multiple files and folders might be easier. The choice is yours, but following a few good tips will make your life easier.
3. Naming plugin functions
When creating a plugin there are some rules for functions and class naming. Don’t use generic function names like “the_excerpt” as it might conflict with another plugin functions or wordpress core. Try to use your plugin name as a prefix to function and class names; you can take a look at the famous plugin “akismet” if you look at the source code you will see that it uses prefix “akismet” before each function or class.
4. Code Documentation
If you are developing for a big community, then documenting your code is considered good manners (and good business). The conventions for this are fairly well established — phpDocumentor is one example. But as long as your code is clean and has some documentation, you should be fine.
While not quite as important as documentation, following coding standards is a good idea if you want your code to comply with WordPress’ guidelines.
5. Plugin security
If you plan to distribute your plugin, then security is of utmost importance, because now you are fiddling with other people’s websites, not just your own. All of the security measures you should take merit their own article, so keep an eye out for an upcoming piece on how to secure your plugin. For now, let’s just look at the theory in a nutshell; you can worry about implementation once you grasp that.
The safety of your plugin usually depends on the stability of its two parts. One Part makes sure that the plugin does not help spread naughty data. Guarding against this entails filtering the user’s input, escaping queries to protect against SQL injection attacks and so on. The second Part makes sure that the user has the authority and intention to perform a given action. This basically means that only users with the authority to delete data (such as administrators) should be able to do it.
6. Plugin readme file
If you want to host your Plugin on https://wordpress.org/plugins/, you need to create a readme.txt file within your plugin directory in a standardized format. You can use the automatic plugin ‘readme.txt’ generator.
7. Plugin website
Creating a website for the Plugin would be helpful to users as it acts as a source of information for your WordPress Plugin. This page should describe how to install the Plugin, what it does, what versions of WordPress it is compatible with, what has changed from version to version of your Plugin, and how to use the Plugin.
Actions and Filters
Before getting started in creating our plugin there are some concepts you need to know related to wordpress plugin Api. WordPress plugins and themes through two import concepts Actions and Filters so what are these:
Action Hooks:
Action hooks are something similar to events. actions hooks triggered when something takes place, such as loading a page, a user logging in, or a custom action that you define in your theme or plugin.
Actions are created and executed with add_action() and do_action() functions.
add_action() take the action_name and a custom callback to be executed when that “action” fires.
do_action() take the action name and fires the attached callbacks assigned to this “action” .
consider this example:
<?php
function todo1() {
    echo "Waking up<br/>";
}

function todo2() {
    echo "Taking my breakfast<br/>";
}

function todo3() {
    echo "Going to work<br/>";
}

add_action("my_todo_list", "todo1");
add_action("my_todo_list", "todo2");
add_action("my_todo_list", "todo3");
In the above code we created three functions then assign them to action called “my_todo_list”. Now to fire this event we use:
<?php

do_action("my_todo_list");

// will output
//
// Waking up
// Taking my breakfast
// Going to work
Filter Hooks
Filter hooks, or filters, control how something happens or change something that’s already being output. You could use a filter to output metadata in a specific format, to override text output by your plugin, or to prevent something from being displayed at all.
You add filters in your code using the apply_filters() and add_filter() functions
Plugin Preparation
Let’s get started with creating our plugin. For the purposes of this tutorial i will create a plugin that will animate the website logo whenever anyone hover the mouse on it and i will use the “animate.css” library. go to the library and download the library css file from here.
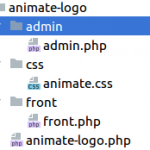
Create a new folder in wp-content/plugins called animate-logo with the following file structure:

Add the animate.css file you just downloaded to the plugin css folder as shown above.
Now open the file “animate-logo.php” and add the following contents:
<?php
/**
 * Plugin Name: Animate Logo
 * Plugin URI: http://animate-logo-website.com
 * Description: This simple plugin uses animate css library to animate logo by choosing from several animation effects
 * Version: 0.0.1
 * Author: Wael Salah
 * Author URI: http://mywebsite.com
 * License: GPL2
 */

defined( 'ABSPATH' ) or die( 'No script access please!' );
In the above code first we added the plugin header; These lines tells wordpress about your plugin info and wordpress uses that info to display your plugin in the plugins list and also to identify your plugin if you want to upload it to WordPress plugin store.
note that if you didn’t add these lines your plugin won’t show up in the your dashboard plugin list. Also note that only the “Plugin Name” and “Description” are required.
This code block tells wordpress to disable direct access to the file if someone tries to access it from outside.
defined( 'ABSPATH' ) or die( 'No script access please!' );
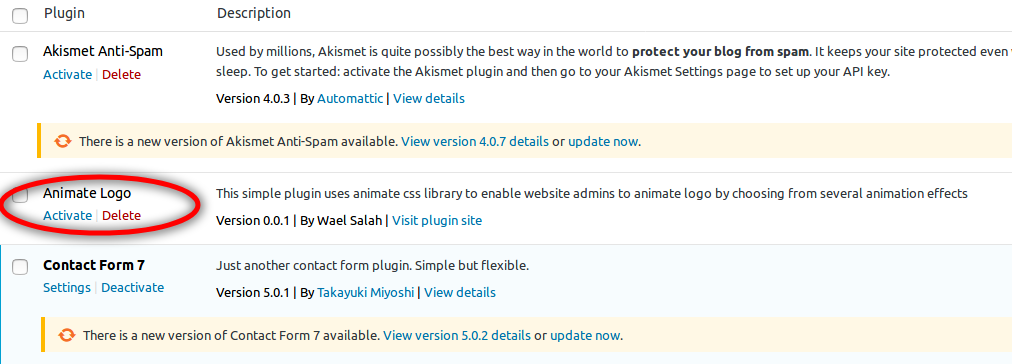
Now if you go to your dashboard in the plugins page you will see that your plugin appears in th list:

Click on activate. Our plugin not doing anything useful yet, Now we want to display a page for our plugin so let’s do it.
The first thing we need to it do is to import the required javascript and css files that will be used by our plugin. In our case we need jquery and animate.css:
<?php
/**
 * Plugin Name: Animate Logo
 * Plugin URI: http://myplugin-website.com
 * Description: This simple plugin uses animate css library to enable website admins to animate logo by choosing from several animation effects
 * Version: 0.0.1
 * Author: Wael Salah
 */

defined( 'ABSPATH' ) or die( 'No script access please!' );

wp_enqueue_script('jquery');

wp_enqueue_style( 'animate-logo-main-style', plugins_url("animate-logo/css/animate.css"),false,'1.0','all');
As shown above we used the wordpress functions wp_enqueue_script() and wp_enqueue_style() to import scripts and stylesheets into our plugin.
Next we will create a function that will display a menu item in the sidebar so we can get access to our plugin setting page:
<?php
/**
 * Plugin Name: Animate Logo
 * Plugin URI: http://myplugin-website.com
 * Description: This simple plugin uses animate css library to enable website admins to animate logo by choosing from several animation effects
 * Version: 0.0.1
 * Author: Wael Salah
 */

defined( 'ABSPATH' ) or die( 'No script access please!' );

wp_enqueue_script('jquery');

wp_enqueue_style( 'animate-logo-main-style', plugins_url("animate-logo/css/animate.css"),false,'1.0','all');

function animate_logo_register_menu_handler()
{
    add_options_page(__( 'Animate Logo', 'textdomain' ), 'Animate Logo', 'manage_options', "animate_logo", 'animate_logo_options_page');
}

add_action("admin_menu", "animate_logo_register_menu_handler");

function animate_logo_options_page()
{
    require_once __DIR__ . "/admin/admin.php";
}
In the above code we created function animate_logo_register_menu_handler(). inside it we called add_options_page() wordpress function. This function displays a menu item in the settings section in sidebar and takes the following paramters:
- page title
- menu title
- capability
- menu slug
- callback function: will display the page contents.
Then we add our function to the special wordpress action hook “admin_menu” as illustrated
add_action("admin_menu", "animate_logo_register_menu_handler");
Finally we created the function that will display our page contents called “animate_logo_options_page” which is the last parameter in add_options_page() as shown here.
function animate_logo_options_page()
{
    require_once __DIR__ . "/admin/admin.php";
}
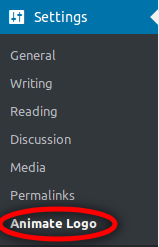
Now refresh your browser you will see that a new menu item called “Animate Logo” appear in the sidebar as shown.

Click here to go to part 2 of the tutorial.
Conclusion
In this part of our tutorial you learned the basics of creating wordpress plugins and we started by understanding the plugin naming conventions, file structure, plugin safety. Next we showed the difference between actions and filters. Then we started creating plugin and prepared our files and displayed the plugin menu and page. Continue to part 2 of the tutorial from this link.


