Modern web apps have changed during the recent few years and this due to the big increase of the javascript tools like single page frameworks and the build tools. One of these tools is the Webpack that allow us to package, compile, and organize the many assets and libraries needed for a modern web project.
Webpack a powerful open-source bundler and preprocessor that can handle a huge variety of different tasks. We’ll show you how to write modules, bundle code, and use some of the loader plugins.
Requirements:
- nodejs
- knowledge with html, css, javascript
Why Webpack
- Great for working with singe-page apps
- Allows for very advanced code splitting
- Hot Reload for quicker development with React, Vue.js and similar frameworks
- Мost popular build tool according to the 2016 JavaScript survey
Installation
We assume that you nodejs installed and we will a package manager like npm or yarn to install webpack so let’s begin.
Create a new directory and cd into it and create two files index.html and package.json and two directories assets and dist:
<html>
	<head>
		<meta charset="utf-8" />
		<title>Web pack tutorial</title>
	</head>
	<body>
		<script src="./dist/vendors.js"></script>
		<script src="./dist/app.js"></script>
	</body>
</html>
In the terminal run this command:
npm install webpack --save-dev
Once we have it installed, it’s best to run webpack via a Node.js script. Add these lines to your package.json:
"scripts": {
        "build": "webpack -p",
        "watch": "webpack --watch"
    }
Now by calling npm run build from the terminal we can make webpack bundle our files (the -p option stands for production and minifies the bundled code). Running npm run watch will start a process that automatically bundles our files when any of them change.
The last part of the setup is to tell webpack which files to bundle up. The recommended way to do this is by creating a config file.
Using webpack config file
We can tell webpack what to do in a config file webpack.config.js and that’ll allow us to use the command webpack without specifying the source (main.js) and the target (bundle.js) and this becomes more powerful when we add loaders and stuff and more configurations. We’ll look into that later.
var path = require('path');

module.exports = {
  entry: './assets/js/index.js',
  output: {
    filename: 'bundle.js',
    path: path.resolve(__dirname, 'dist')
  }
};
The entry option tells webpack which is our main JavaScript file. There are many different strategies for configuring entry points but in most cases a single entry is enough.
In output we specify the name and path of our bundle. After running webpack we will have all our JavaScript in a file called bundle.js. This is the only script file that we will link in our HTML:
<script src="./dist/bundle.js"></script>
Webpack Modules
Webpack provides multiple ways to work with modules, and most of the time you are free to go with whichever one you like. For this tutorial we will use the ES6 import syntax.
Let’s create a module that outputs to the console. We create a file called log.js and make it export a simple function:
function logger() {
    console.log('Have a great day!');
};

export default logger;
To use this module, we have to import it and call it in our entry point, which if you look back at the config file is index.js.
import logger from './logger.js';

console.log("I'm the entry point");
logger();
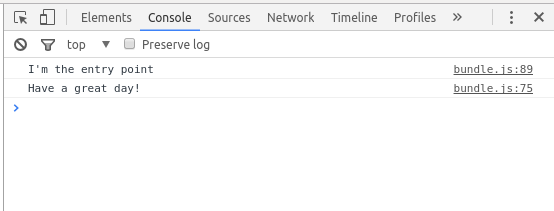
Now when we run the bundler with npm run build, and open our HTML in the browser, we see this:
Requiring Libraries
Webpack enable us to import and use any module. so let’s import and use moment.js by directly importing it into our logger module.
npm install moment --save
Then in our logger module, we simply import the library exactly the same way we imported local modules in the previous point:
import moment from 'moment';

function logger() {
    var day = moment().format('dddd');
    console.log('Have a great ' + day + '!');
};

export default logger;
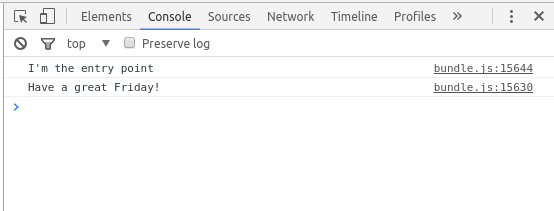
After we bundle up again to apply the changes, in the browser console we will have the following messages:
Loaders
Loaders are webpack’s way to execute tasks during bundling and pre- or post-process the files in some manner. For example, they can compile TypeScript, load Vue.js components, render templates, and much more. Most loaders are written by the community, for a list of popular loaders go here.
Let’s say we want to add a linter to our project that checks our JS code for errors. We can do so by including the JSHint loader, which will catch all kinds of bad practices and code smells.
First we need to install both JSHint and the webpack JSHint loader:
npm install jshint jshint-loader --save-dev
Afterwords, we are going to add a few lines to our webpack config file. This will initialize the loader, tell it what type of files to check, and which files to ignore.
var path = require('path');

module.exports = {
  entry: './assets/js/index.js',
  output: {
    filename: 'bundle.js',
    path: path.resolve(__dirname, 'dist')
  },
  // Add the JSHint loader
  module: {
    rules: [{
      test: /\.js$/, // Run the loader on all .js files
      exclude: /node_modules/, // ignore all files in the node_modules folder
      use: 'jshint-loader'
    }]
  }
};
Now when webpack is started, you will see a list of warnings in the terminal.
Conclusion
Webpack is a great tool for web development as it works with many packages to make the development rapid and easy. In this tutorial we showed the very basic concepts of it also refer to the webpack website for helpful resources and guides.

