A new feature has been included in Vuejs 3 which is the Teleport component. With Teleport we can move and render any component outside the scope of the vue app.
When working with vuejs we have to nest components inside each other and encapsulate UI and behavior inside these components. In some scenarios we have to move some parts of vue components outside of the vue app to work. A common example of this when displaying popups and modals as the modal is supposed to be rendered relative to the body element.
In some cases the modal can work if it’s nested as a normal vue component. But in other cases we have to render this modal element outside of the Vue app i.e. relative to the body element.
I have managed to solve this is the past in Vuejs 2 by writing some code. Fortunately in vuejs 3 this can be accomplished easily using the <teleport> component.
To illustrate the teleport we will create a simple app where we have a modal component and we will teleport this modal outside of the Vue app. So let’s prepare a simple vuejs 3 app similar to this structure:

In the Home.vue component we have a button to show a modal which located in Modal.vue.
At first update package.json:
{
  "name": "vuejs3-teleport",
  "version": "1.0.0",
  "description": "",
  "main": "app.js",
  "scripts": {
    "test": "echo \"Error: no test specified\" && exit 1",
    "dev": "webpack"
  },
  "author": "",
  "license": "ISC",
  "dependencies": {
    "@vue/compiler-sfc": "^3.0.0-alpha.11",
    "css-loader": "^5.2.0",
    "vue": "^3.0.11",
    "vue-style-loader": "^4.1.3",
    "webpack": "^4.0.0"
  },
  "devDependencies": {
    "vue-loader": "^16.0.0-alpha.3",
    "webpack-cli": "^4.6.0"
  }
}
Then install npm dependencies:
npm install
Update webpack.config.js like so to enable compiling our vue app:
const path = require('path');
const { VueLoaderPlugin } = require('vue-loader');

module.exports = {
  entry: './app.js',
  output: {
    path: path.resolve(__dirname, './dist'),
    filename: 'app.js',
  },
  mode: 'development',
  module: {
    rules: [
      {
        test: /\.vue$/,
        loader: 'vue-loader'
      },
      {
        test: /\.css$/,
        use: [
          'vue-style-loader',
          'css-loader'
        ]
      }
    ]
  },
  plugins: [
    new VueLoaderPlugin()
  ]
}
Open and update app.js as follows:
import {createApp} from "vue";

import App from "./App.vue";

createApp(App).mount("#app");
Here we are creating a Vue app using the new Vue 3 syntax by calling the createApp() function and mounting the app into “#app” selector we will see below in index.html.
Open App.vue and update with this code:
<template>
    <Home />
</template>

<script>
    import Home from "./components/Home.vue";

    export default {
        components: {
            Home
        }
    }
</script>
components/Home.vue
<template>
    <button @click="modalOpen = true">
      Open popup
    </button>

    <Modal :modal-open="modalOpen" @dismissModal="modalOpen = false"></Modal>
</template>

<script>
    import Modal from "./Modal.vue";

    export default {
      data() {
        return {
          modalOpen: false
        }
      },
      components: {
        Modal
      }
    }
</script>
In this code above we have a button and the <Modal /> component, when clicking the button we set the modalOpen to true thus showing the modal. Now update Modal.vue as shown below:
components/Modal.vue
<template>
  <div v-if="modalOpen" class="modal">
    <div>
      <h3 class="modal-header">Modal Header</h3>
      <div>
        <p>Lorem Ipsum is simply dummy text of the printing and typesetting industry.
          Lorem Ipsum has been the industry's standard dummy text ever since the 1500s,
          when an unknown printer took a galley of type and scrambled it to make a type specimen book.
          It has survived not only five centuries, but also the leap into electronic typesetting,
          remaining essentially unchanged
        </p>
      </div>
      <button @click="$emit('dismissModal')">
        Close
      </button>
    </div>
  </div>

</template>

<script>
export default {
  name: "Modal",
  props: ["modalOpen"]
}
</script>

<style scoped>
  .modal {
    position: fixed;
    width: 500px;
    min-height: 300px;
    top: 19%;
    left: 33%;
    padding: 10px;
    border: 6px solid #cccc;
  }

  .modal-header {
    border-bottom: 2px solid #ccc;
  }

  button {
    margin-top: 20px;
    width: 100%;
    background: #881c2b;
    color: #fff;
    padding-top: 11px;
    padding-bottom: 11px;
    border-radius: 5px;
  }
</style>
Now run:
npm run dev
This will generate the compiled file in dist/app.js which we will use in index.html below.
index.html
<!DOCTYPE html>
<html lang="en">
<head>
  <meta charset="utf-8" />
  <title>Teleport</title>
</head>
<body>
  <div id="app"></div>
  <script src="./dist/app.js"></script>
</body>
</html>
Launch your app in the browser and click “show pop” button you will see the modal.
The point here now is to open the developer tools in your browser and inspect the modal component like this figure:
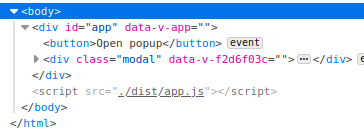
As you see the <div class=”modal”> inside the main app component, now let’s apply the teleport and move this component outside.
In Home.vue make this update as follows:
    <teleport to="body">
        <Modal :modal-open="modalOpen" @dismissModal="modalOpen = false"></Modal>
    </teleport>
I enclosed <Modal /> inside teleport component, the teleport takes prop “to” which represent an html selector to be appended on. Valid selectors include “body”, “#” for id selectors, “.” for class selectors. In this case we appended it in the body element.
Again run:
npm run dev
This time inspect the component you will see it as shown:
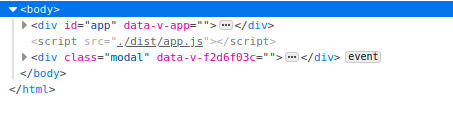
The <div class=”modal”> become outside the app component.
Also we can teleport any component into specific element with specific id, let’s update index.html and add <div id=”modals”>:
<div id="app"></div>

  <div id="modals"></div>

  <script src="./dist/app.js"></script>
Now instead of teleporting the <Modal /> into body directly we will teleport it inside div with id of #modals. So update the teleport element in Home.vue as shown:
<teleport to="#modals">
        <Modal :modal-open="modalOpen" @dismissModal="modalOpen = false"></Modal>
    </teleport>
I changed the “to” prop to be “#modals”. Now inspect the DOM you will that the modal inside #modals div.