Frontend frameworks like vuejs seek to provide the user with a better user experience when dealing with data so the question is how to persist the data in vuejs apps and the answer is with Vuex library.
As we know that vuejs framework is a frontend javascript framework and it uses the concept of the virtual Dom to render the page elements so when anything changes in the page it only refresh those parts only without reloading all the page and this will speed up page load time. In order to do this it uses a central store which holds all the data of the application. This store acts as a big array of all application data.
Vuejs provides us with a library called Vuex which will act the Vuejs store and its much like the Redux store in ReactJs.
Installation:
Using npm
npm install vuex
Using cdn
<script src="/path/to/vue.js"></script>
<script src="/path/to/vuex.js"></script>
Vuex Components:
- State: This is the initial app state.
- Mutations: These are actions that will change and modify the state by committing the mutation. to execute mutation use:
this.$store.commit('mutation_name', value)
- Getters: These functions allow you computer a derived state based on a store state.
- Actions: It’s like mutations but actions commit mutations instead of modify the state directly, can also be used with async operations like ajax requests. to execute action use:
this.$store.dispatch('action_name')
So a typical Vuex store will have the below components:
new Vuex.Store({
	 state: {
             // this object holds the state data
         },

         mutations: {
              // this object holds the mutation functions
         },

         actions: {
             // this object holds the actions functions
         },

         getters: {
             // this object holds the getters
         }

});
In most apps you will need only the state and the mutations but in big and large applications you need also the actions and getters.
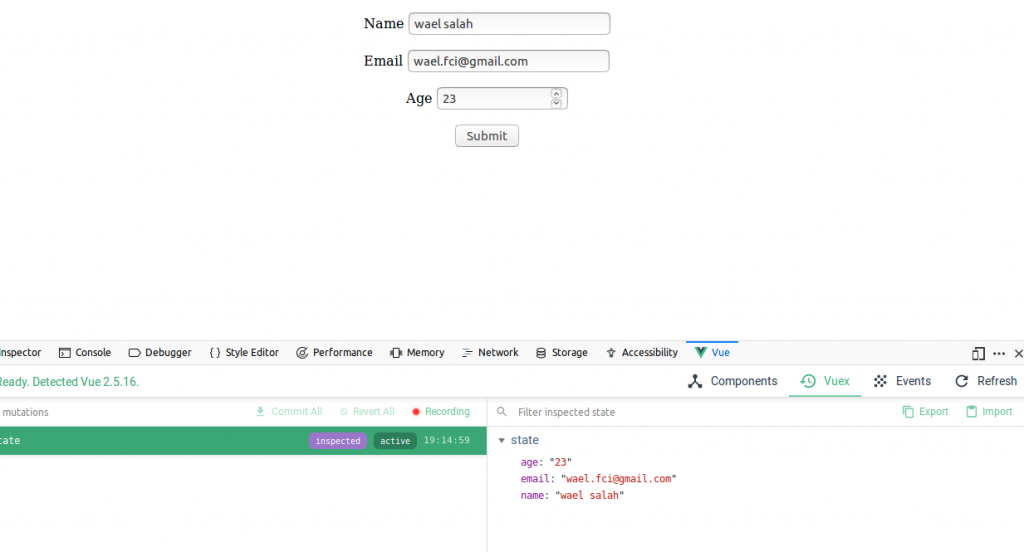
Let’s see a simple example to describe the process, in this example we will create a simple form then we will attach it’s data with Vuex store as shown below:
<html>
   <head>
      <title>Vuex</title>
      <script type = "text/javascript" src = "./vue.js"></script>
      <script type = "text/javascript" src = "./vuex.js"></script>
   </head>
   <body>
      <div id = "app">
         <simple-form></simple-form>
      </div>


      <script type="text/javascript">
         const store = new Vuex.Store({
            state: {
               name: "",
               email: "",
               age: ""
            },
            mutations: {
               setName(state, data) {
                  state.name = data;
               },
               setEmail(state, data) {
                  state.email = data;
               },
               setAge(state, data) {
                  state.age = data;
               }
            }
         });

         const SimpleForm = {
            template: `
               <div>
                  <form method="post">
                     <p>
                       <label>Name</label>
                       <input type="text" name="name" v-model="name" />
                     </p>
                     <p>
                       <label>Email</label>
                       <input type="text" name="email" v-model="email" />
                     </p>
                     <p>
                       <label>Age</label>
                       <input type="number" name="age" v-model="age" />
                     </p>
                     <p><button type="button" @click="submit">Submit</button></p>
                  </form>
               </div>
            `,
            computed: {
               name: {
                   get() {
                      return this.$store.state.name;
                   },
                   set(value) {
                       this.$store.commit('setName', value);
                   }
               },
               email: {
                   get() {
                      return this.$store.state.email;
                   },
                   set(value) {
                       this.$store.commit('setEmail', value);
                   }
               },
               age: {
                   get() {
                      return this.$store.state.age;
                   },
                   set(value) {
                       this.$store.commit('setAge', value);
                   }
               }
            },
            methods: {
                submit () {
                  if(this.$store.state.name == "") {
                     alert("Name required");
                     return false;
                  }

                   if(this.$store.state.email == "") {
                     alert("Email required");
                     return false;
                  }

                  if(this.$store.state.age == "") {
                     alert("Age required");
                     return false;
                  }

                  alert("Name "+ this.$store.state.name + " Email: " + this.$store.state.email + " Age: " + this.$store.state.age)
                }
             }
         }

         new Vue({
              el: '#app',
              store: store,
              components: { SimpleForm }
      });


      </script>
   </body>
</html>
Let’s break the app into pieces, first we load the vue and vuex scripts, then we create a new instance of the vuex store so for every element in the form we have a vuex state object and vuex mutation like this:
const store = new Vuex.Store({
            state: {
               name: "",
               email: "",
               age: ""
            },
            mutations: {
               setName(state, data) {
                  state.name = data;
               },
               setEmail(state, data) {
                  state.email = data;
               },
               setAge(state, data) {
                  state.age = data;
               }
            }
         });
Then we create a component SimpleForm along with the template and computed properties, the very important part is the computed properties that will achieve the two way model binding with the form element like this:
<input type="text" name="name" v-model="name" />
computed: {
               name: {
                   get() {      // retrieve the state element
                      return this.$store.state.name;
                   },
                   set(value) {      // update the state element
                       this.$store.commit('setName', value);
                   }
               }
}
So when you load the application for the first time it will load the initial state on every form element triggered with get() computed property and when you type into any of the fields it will trigger set() which in turn will update the state by committing it as shown:
set(value) {
          // call the mutation
          this.$store.commit('setName', value);
}
After that we submit the form checking for each value if it’s not empty and displayed every element in an alert box.
To view the state in the browser download the extension called vue dev tools available in Chrome and Firefox