In our today tasks we have used to deal with external apis in facebook or twitter, But how to build something like this, an Api or Widget that works without using external dependencies or libraries.
In this tutorial you will learn how to build an embed-able Javascript plugin or API or in some cases called (Widgets), that can be injected to any website and work without using any external dependencies or libraries. For the purposes or this tutorial you must have a basic knowledge of frontend development using javascript, html and css and also backend development using any language in my case i will use PHP.
Prerequisites
- Http server with backend language (PHP for example)
- Knowledge with backend and frontend develpment.
Before diving into creating an embed-able javascript plugin you must follow specific convention for including the plugin script file. Let’s imagine this example from the Facebook SDK, where it outputs it’s script using the below code:
<script>
(function(d, s, id){
     var js, fjs = d.getElementsByTagName(s)[0];
     if (d.getElementById(id)) {return;}
     js = d.createElement(s); js.id = id;
     js.src = "https://connect.facebook.net/en_US/sdk.js";
     fjs.parentNode.insertBefore(js, fjs);
   }(document, 'script', 'facebook-jssdk'));
</script>
This code seems confusing but if you understand it line by line you will get the idea, this example actually just inserting a script tag into the page using a dynamic way so it’s equivalent to this line:
<script src="https://connect.facebook.net/en_US/sdk.js" id="facebook-jssdk"></script>
So how this code works, let’s simplify the above code into a simple Javascript function so it will be equivalent to this code:
<script>
var func = function(d, s, id) {
 var js, fjs = d.getElementsByTagName(s)[0];
 if (d.getElementById(id)) {return;}
 js = d.createElement(s); js.id = id;
 js.src = "https://connect.facebook.net/en_US/sdk.js";
 fjs.parentNode.insertBefore(js, fjs);
}

func(document, 'script', 'facebook-jssdk');
</script>
The function takes three parameters document which represents the document object, script which represents the html <script> tag, facebook-jssdk which is the id of the <script> tag. The first line retrieves all elements with tag name script:
var js, fjs = d.getElementsByTagName(s)[0];
Then it checks if there is any tag in the document with this id, it will return otherwise will continue. It’s important to give your script a unique id and be sure that it will not conflict with other ids in the document.
if (d.getElementById(id)) {return;}
The third line it creates the script tag and assign it the id and src attributes like this:
js = d.createElement(s); js.id = id;
js.src = "https://connect.facebook.net/en_US/sdk.js";
and finally the most important line which to output the script into the page before any other scripts:
fjs.parentNode.insertBefore(js, fjs);
If you want you can also control to output your script in the head or footer of the page or after or before any other elements,
Advantages
- The first advantage of writing a Widget without depending on external library is that you can use anywhere on any compatible browser without need to import any external dependency like jQuery.
- Be sure that the plugin will work on almost browsers and platforms.
- Run on any browser either desktop or mobile because you don’t depend on specific platform.
- Can be customized with a lot of options to change appearance and behavior and an easy way.
Disadvantages
- Needs an extensive testing to be sure that it’s working on almost every desktop and mobile browser.
Now let’s put these concepts in action using a real world example, in this example we will create an embed-able widget. This widget is a simple box you can of it to be shown on sidebar or where ever and it will grab the latest xml feeds of any website and can be used as embeded widget to be used in other websites.
Widget Architecture

As shown in the above figure the Javascript widget have a set of components:
- The main javascript code: which is responsible for handling the widget logic and functionality.
- Server code: the widget may need to send and receive data from server in order to finish it’s functionality.
- Webpage: which you will insert this widget in.
- Calling the javascript Api: which includes importing the javascript file as mentioned in above steps and calling the Widget Api.
Preparing Widget
Let’s create a new directory in your server webroot (htdocs) call it what ever you want, then create the following files in it:
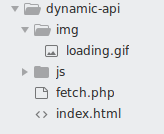
The js/widget.js will contain the main javascript code, fetch.php will be used to fetch the remote xml file contents, we use server side code here for this functionality in order to avoid problems such as cross domain requests. index.html will be used to import and render the widget code.
index.html
<!DOCTYPE html>
<html>
<head>
	<title>Dynamic widget</title>
	<meta charset="utf-8" />
</head>
<body>

	<div id="xml-grabber"></div>

	<script>

		(function(doc, tag, id){
     		var js = doc.getElementsByTagName(tag)[0];
     		if (doc.getElementById(id)) {return;}
     		js = doc.createElement(tag); js.id = id;
     		js.src = "./js/widget.js";
     		js.type = "text/javascript";
     		doc.body.appendChild(js);
   		}(document, 'script', 'xml-feed-grabber'));
	</script>
</body>
</html>
js/widget.js
/**
* Xml Feed Javascript Api
*
* Xml Feed Javascript Api can be used to display the latest feeds
* from any website that has an xml feed url. Plugin have multiple options
* for customizing the widget appearance and url
*
*/

var XmlFeedGrabber = {
   options: {
   },
   targetHtmlEle: "",
   messages: {{
   },
   themes: {
   },
   setOptions: function(options) {
   },
   validate: function () {
   },
   render: function() {
   },
   fetch: function(callback) {
   },
   template: function(response) {
   },
   applyCss: function() {
   }
}
As shown above in the index.html we just imported the javascript file. We will come back to this file later after we finish the widget.js
In the main javascript file we added an object called XmlFeedGrabber, this object will hold the widget code and here we added a couple of functions and properties which are options which will hold the widget options like feed url, number of items etc,
targetHtmlEle represent the html element that this widget will be rendered in. messages() represent the error messages. themes() function return the available themes of this widget, setOptions() functions allows you to set any of the widget options.
validate() function will validate the widget, fetch() function will be used to send and fetch the xml response from the server, template() function will return the widget template that will be rendered using the render() function.
Adding Widget Options and Messages
Let’s add the widget options and how to manipulate those options so open js/widget.js and modify it like shown below:
/**
* Xml Feed Javascript Api
*
* Xml Feed Javascript Api can be used to display the latest feeds
* from any website that has an xml feed url. Plugin have multiple options
* for customizing the widget appearance and url
*
*/

var XmlFeedGrabber = {
   options: {
		feedUrl: "",
		itemsCount: 5,
		targetId: "xml-grabber",
		openInNewWindow: true,
		showMedia: true,
		showDescription: false,
		currentTheme: "",
                loaderUrl: "img/loading.gif"
	},
	targetHtmlEle: "",
	messages: {
		missingTargetId: "please specify element target id",
		missingTargetHtml: "not found html element with the specified id",
		missingFeedUrl: "please specify your xml feed url",
		errorFetchingData: "Error reading data from the remote url"
	},
        themes: {
        },
        setOptions: function(options) {
		if(options.feedUrl) {
			this.options.feedUrl = options.feedUrl;
		}

		if(options.itemsCount) {
			this.options.itemsCount = options.itemsCount;
		}

		if(options.targetId) {
			this.options.targetId = options.targetId;
		}

		if(options.openInNewWindow) {
			this.options.openInNewWindow = options.openInNewWindow;
		}

		if(options.showMedia) {
			this.options.showMedia = options.showMedia;
		}

		if(options.showDescription) {
			this.options.showDescription = options.showDescription;
		}

		if(options.currentTheme && this.themes[options.currentTheme] != undefined) {
			this.options.currentTheme = this.themes[options.currentTheme];
		}

                if(options.loaderUrl) {
			this.options.loaderUrl = options.loaderUrl;
		}
	},
        .....
}
We just added some options to control the widget also called the default options like feed url, items count, target Id which represents the element id to be inserted on, showMedia to enable or disable showing media and others.
As a rule of thumb every javascript embed-able widget must have options, this enable users to switch between the different behaviors of the widget, for example like the facebook box widget.
In the setOptions() functions we check if any option passed then we update that option.
Validating the widget options
To validate the widget we updated the validate() function as shown below:
validate: function () {

		if(!this.options.targetId) {

			console.log(this.messages.missingTargetId);

			return false;
		}

		if(!this.options.feedUrl) {

			console.log(this.messages.missingFeedUrl);

			return false;
		}

		this.targetHtmlEle = document.getElementById(this.options.targetId);

		if(!this.targetHtmlEle) {

			console.log(this.messages.missingTargetHtml);

			return false;
		}

		return true;
	}
The above function checks for some options to be sure it exists otherwise it won’t work like the feed url, and target element then we output some messages in the console about that error and return false.
It’s a best practice to show error on the browser console and not in alert box, this is a common behavior in embed-able widgets.
Rendering the widget
Let’s render our widget so we will update the render(), fetch(), template(), and applyCss() functions as shown below:
render: function() {

		var self = this;

		if(!this.validate()) {

			return;
		}

                // show loader
		self.targetHtmlEle.innerHTML = '<img class="xml-grabber-loader" src="'+ this.options.loaderUrl +'" />';

		// apply styling
		self.applyCss();


		// fetch data
		this.fetch(function(response) {

			var json = JSON.parse(response);

			if(json.state == 1) {

				self.targetHtmlEle.innerHTML = self.template(json.data);

			} else {

				console.log(self.messages.errorFetchingData);
			}

		});
	},
	fetch: function(callback) {

		if (window.XMLHttpRequest) {
			var xhr = new XMLHttpRequest();
		} else {
			var xhr = new ActiveXObject("Microsoft.XMLHTTP");
		}

		xhr.addEventListener("readystatechange", function () {
	  		if (this.readyState === 4 && this.status === 200) {
	    		callback(this.responseText);
	  		}
		});

		var params = "url=" + encodeURIComponent(this.options.feedUrl) + "&itemsCount=" + this.options.itemsCount + "&showDescription=" + this.options.showDescription + "&showMedia=" + this.options.showMedia;

		xhr.open("POST", "./fetch.php");
		xhr.setRequestHeader("Content-Type", "application/json");
		xhr.setRequestHeader("dataType", "application/json");
		xhr.send(params);
	},
	template: function(response) {

		var self = this;


		var html = '<ul class="xml-grabber-items">';

		response.forEach(function(element) {

			html += '<li class="xml-grabber-item">';

			html += '<a href="' + element.link + '" target="' + (self.openInNewWindow == true?"_blank":"self")  + '">';

			if(element.media !== undefined) {

				html += '<img src="' + element.media + '" width="100px" height="80px" />';
			}

			html += '<span class="xml-grabber-title">' + element.title + '</span>';

			html += '</a>';

			if(element.pubDate !== undefined) {
				html += '<span class="xml-grapper-date">' + element.pubDate + '</span>';
			}

			if(element.description !== undefined) {
				html += '<span class="xml-grabber-description">' + decodeURIComponent(element.description) + '</span>';
			}

			html +'</li>';

		});

		html += '</ul>';

		return html;
	},
	applyCss: function() {

		if(this.options.currentTheme == "") {

			this.options.currentTheme = this.themes["default"];
		}

		var rules = "ul.xml-grabber-items { list-style-type: none; }";

		rules += "#xml-grabber { border: 1px solid #908787; border-radius: 7px; background: " + this.options.currentTheme.background + "; }"

		rules += "li.xml-grabber-item { margin-bottom: 48px; border-bottom: 1px solid #ccc; }";

		rules += "li.xml-grabber-item a { text-decoration: none; }";

		rules += "li.xml-grabber-item img { border: 3px solid " + this.options.currentTheme.imgBorderColor + "; }";

		rules += ".xml-grabber-title { vertical-align: top; margin-left: 8px; color: " + this.options.currentTheme.titleColor + "; font-family: sans-serif; font-weight: bold; }";

		rules += ".xml-grabber-description { font-size: 15px; font-family: sans-serif; color: " + this.options.currentTheme.descriptionColor + " }";

		rules += ".xml-grapper-date { color: " + this.options.currentTheme.dateColor + "; font-size: 11px; display: block; }";

		var styleTag = document.createElement('style');

      	styleTag.type = 'text/css';

      	styleTag.appendChild(document.createTextNode(rules));

      	document.head.appendChild(styleTag);
	}
In the above code in the render() function we first called the validate() function, then if everything ok then we apply the widget CSS by calling applyCss() function which renders some Css rules into the page head.
After that we called the fetch function which do an Httpxmlrequest to server sending a post request to the fetch.php file which we update it below. Then on successful response we called the template() function on the target element which takes the response and apply it to specific template and return it.
Widget Themes
Modify the themes() function to be like this:
themes: {
		default: {
			background: "#efe9e9",
			titleColor: "#000",
			dateColor: "#dadada",
			imgBorderColor: "#ddd",
			descriptionColor: "#000"
		},
		beige: {
			background: "#882d2d",
			titleColor: "#fff",
			dateColor: "#dadada",
			imgBorderColor: "#44af60",
			descriptionColor: "#000"
		},
		green: {
			background: "#10d010",
			titleColor: "#fff",
			dateColor: "#b90404",
			imgBorderColor: "#a97e1d",
			descriptionColor: "#000"
		},
		purple: {
			background: "#6310d0",
			titleColor: "#fff",
			dateColor: "#f7f3f3",
			imgBorderColor: "#a97e1d",
			descriptionColor: "#000"
		},
		dark: {
			background: "#000",
			titleColor: "#fff",
			dateColor: "#f7f3f3",
			imgBorderColor: "#a97e1d",
			descriptionColor: "#fff"
		}
	}
Widget Backend
Open fetch.php and update it like this:
<?php
header('Content-Type: application/json; charset=utf-8');

$params = file_get_contents("php://input");

parse_str($params, $paramArray);

$url = $paramArray['url'];

$itemsCount = $paramArray['itemsCount'] > 0 ? $paramArray['itemsCount'] : 5;

$showDescription = $paramArray['showDescription'];

$showMedia = $paramArray['showMedia'];


try {
	$curl = curl_init();

	curl_setopt_array($curl, array(
	  CURLOPT_URL => $url,
	  CURLOPT_RETURNTRANSFER => true,
	  CURLOPT_ENCODING => "",
	  CURLOPT_MAXREDIRS => 10,
	  CURLOPT_TIMEOUT => 30,
	  CURLOPT_HTTP_VERSION => CURL_HTTP_VERSION_1_1,
	  CURLOPT_CUSTOMREQUEST => "GET"
	));

	$response = curl_exec($curl);
	$err = curl_error($curl);

	curl_close($curl);

	if ($err) {
	  throw new Exception($err);
	} else {

		$simpleXmlObj = new SimpleXmlElement($response);

		$namespaces = $simpleXmlObj->getNamespaces(true);

		$items = [];

		$counter = 0;

		foreach($simpleXmlObj->channel->item as $entry) {

			if($counter == $itemsCount) break;

			$arr['title'] = (string) $entry->title;

			$arr['link'] = (string) $entry->link;


			if(isset($entry->pubDate)) {
				$arr['pubDate'] = (string) $entry->pubDate;
			}

			if($showDescription == 'true') {
				$arr['description'] = mb_substr(str_replace("'", "", str_replace('"', "", (string) $entry->description)), 0, 150, "utf-8") . "...";
			}

			if($showMedia) {
				if(isset($namespaces['media']) && $entry->children($namespaces['media']) !== null) {
					$arr['media']= (string)
		                    $entry->children($namespaces['media'])->content->attributes()->url;
				} else if(isset($entry->enclosure) && isset($entry->enclosure->attributes()['url'])) {
					$arr['media']= (string) $entry->enclosure->attributes()['url'];
				} else if(isset($entry->image) && isset($entry->image->url)) {

					$arr['media']= (string) $entry->image->url;
				}
			}

	        $items[] = $arr;

	        $counter++;
	    }

	  echo json_encode(['state' => 1, 'data' => $items]);
	}
} catch(Exception $e) {
	echo json_encode(['state' => 0, 'data' => $e->getMessage()]);
}
In the above php code we make a remote http request using CURL and then after receiving the response we manipulate the xml file using php SimpleXmlElement which processes the xml file and loops over xml items and returning it as a json response.
Calling the Widget
Now let’s try our widget with a sample xml feed i used the webmobtuts website feed url, so open index.html and update it as shown:
<!DOCTYPE html>
<html>
<head>
	<title>Dynamic api</title>
	<meta charset="utf-8" />
</head>
<body>

	<div id="xml-grabber"></div>

	<script>

		(function(doc, tag, id){
     		var js = doc.getElementsByTagName(tag)[0];
     		if (doc.getElementById(id)) {return;}
     		js = doc.createElement(tag); js.id = id;
     		js.src = "./js/plugin.js";
     		js.type = "text/javascript";
     		doc.body.appendChild(js);
   		}(document, 'script', 'xml-feed-grabber'));

		window.onload = function() {
			XmlFeedGrabber.setOptions({
				feedUrl: "http://webmobtuts.com/feed/",
				showDescription: true,
                                itemsCount: 10,
				currentTheme: "beige"
			});

   			XmlFeedGrabber.render();
   		}
	</script>
</body>
</html>
All we have done is calling the widget on window.onload() function then we passed the feedUrl and called render().