Performing animations can be a simple and a complex task depending on what you want to achieve, in this article i will describe some concepts that can be used to perform javascript animations.
If you performed animation before using other tools or technologies you have the basic idea behind animation. Animation is about updating an object state over time, also animation can be described a sequence of frames of an object that displayed sequentially with constant or varied speed. For example when i need to animate a moving car as shown in this figure we can achieve this by updating the position of the car i.e updating the x axis position.

Animation Rules
- Using timing function like setInterval() or requestAnimationFrame().
- Using absolute position values: Position values include the top, bottom, left, right. Also we can use html5 transformation properties like translate, rotate, scale.
- Using easing function: This mathematical equations specify the position values to update the object to over time.
In the next sections i will cover each point of these with examples.
setInterval
The common way to animate in javascript by using setInterval() function. setInterval() accept a callback function as the first parameter and number of seconds to execute this function as the second parameter.
// terminology
setInterval(function() {}, numsecond);
Note that setInterval() run infinitely, this is ideal for certain animations but it’s not ideal for other animations where we need to stop the animation if it meets a certain condition, for that purpose to stop the setInterval() execution we use another function which is clearInterval(intervalObject) which takes the interval instance variable returned by setInterval.
let intervalObject = setInterval(function() {}, numsecond);

if(condition) {
  clearInterval(intervalObject);
}
Simple Example: animating progress bar
Let’s see a simple example of animating progress bar with setInterval(), then in the next sections i will walk some complex examples.
<!DOCTYPE html>
<html lang="en">
<head>
    <meta charset="UTF-8">
    <title>Animation - progress bar</title>
    <style>
        #progress-bar {
            width: 100%;
            height: 20px;
        }

        #progress-bar div{
            background-color: blue;
            height: 100%;
            text-align: center;
            color: #fff;
        }
    </style>
</head>
<body>

    <div id="progress-bar">
        <div></div>
    </div>

    <script>
        (function (selector) {

            let width = 0;

            let interval = setInterval(function () {

                if(width === 100) {
                    clearInterval(interval);
                    return;
                }

                width += 10;

                let inner = selector.getElementsByTagName("div")[0];
                inner.style = "width: " + width + "%";
                inner.innerText = width + "%";

            }, 1000);
        })(document.querySelector("#progress-bar"));
    </script>
</body>
</html>
In this code i demonstrate using setInterval() to render an animated progress bar which increases by 10 then when it reaches 100% it stops using clearInterval() function.
The function above takes a DOM element then i called setInterval() assigning it to a local variable ‘interval’. setInterval() takes an function to execute and number of milliseconds, in this case i want function to execute every 1 second so i passed 1000 milliseconds. Next inside setInterval() first i check if the width reaches a value of 100 then i stop setInterval() otherwise i increment the width by 10, thereby updating the inner div style width using this width.
Now i think you begin to understand setInterval() and how to apply it to create simple animations. Let’s move into another point which to use absolute positioning when creating animations.
Absolute Positions
May be you familiar with CSS absolute positions, in case you don’t have an idea absolute position works by specify position: absolute or position: fixed so what’s the difference? when you specify position: absolute, the element is absolute relative to the direct parent element. In the other hand when you specify position: fixed the element is absolute relative to the window. This figure clearly explains the difference:
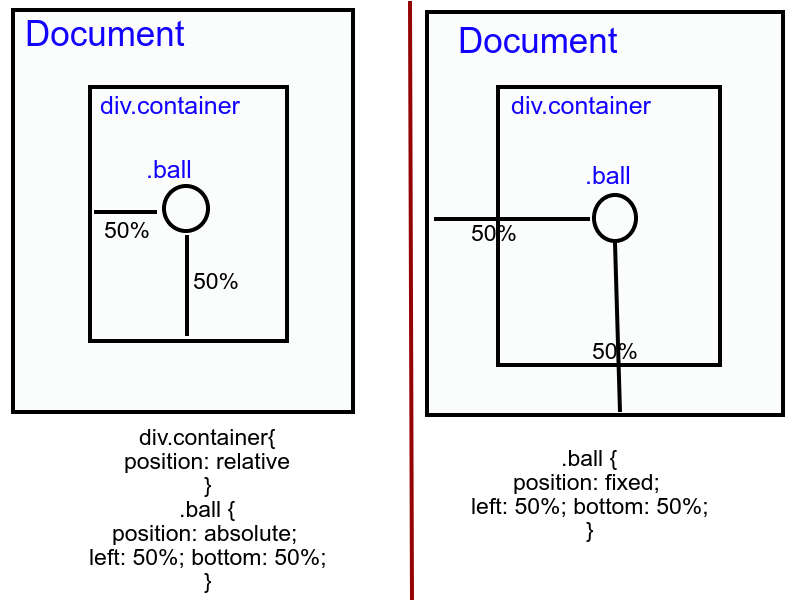
The left side describe the absolute position, note that for absolute position to work well the direct parent element must be set as position: relative as shown above, the div.container is the direct parent to .ball, then .ball is set as position: absolute and left: 50% and bottom: 50% relative to div.container. Of course you can use pixel values for left and bottom.
The right side describe fixed position, the fixed position is like absolute but relative to the entire document so i don’t need to make the direct container as position: relative, just you tell the target element as position: fixed as shown.
Let’s see an example for absolute positioning, in this example we will animate moving a car:
<!DOCTYPE html>
<html lang="en">
<head>
    <meta charset="UTF-8">
    <title>Animation - moving a car</title>
    <style>

        #container {
            width: 1300px;
            height: 550px;
            border: 1px solid #000;
            position: relative;
            background: url('./grass.png') no-repeat;
            background-position: 0 bottom;
            background-size: contain;
        }

        #car {
            position: absolute;
            width: 100px;
            bottom: 97px;
            left: 2px;
        }

    </style>
</head>
<body>

    <div id="container">
        <img src="./car.png" id="car" />
    </div>

    <script>
        (function (selector) {

            let start_pos = 2;  // start from 2 pixel left
            let end_pos = document.querySelector("#container").getBoundingClientRect().width - 100;

            let interval = setInterval(function () {

                if(selector.offsetLeft >= end_pos) {
                    start_pos = 2;
                } else {
                    start_pos++;
                }


                selector.style = `left: ${start_pos}px`;

            }, 10);
        })(document.querySelector("#car"));
    </script>
</body>
</html>
In this code i move a car by updating the left position over time, i added a simple check to reset the position if the car reaches the end width of the parent div, here i get the width of the parent div using javascript getBoundingClientRect() function, then i compared this with the car offsetLeft property which gives the current left position. The result shown in this picture:

You can download the script assets from this link.
requestAnimationFrame
Although setInterval() can be used in a variety of animation scenarios, browser vendors released a new specification which is requestAnimationFrame() function, this function created basically for animation purposes, for that reason it has some advantages over setInterval() which include:
- Less CPU, GPU and memory usage
- Stop automatically in case browser tab is hidden
- 60 times per second refresh rate optimal for most web browsers.
Let’s see the previous example rewritten using requestAnimationFrame().
<script>

            let x = 0;
            function animate() {
                // increment x by 2 each iteration
                x += 2;

                // set our object's left property to x
                document.querySelector("#car").style.left = x + "px";

                // if x gets too large, reset it back to 0
                if (x > 1000) {
                    x = 0;
                }

                requestAnimationFrame(animate);
            }

            animate();
    </script>
requestAnimationFrame(callback) accepts a callback as a parameter and executes this callback in every repaint, As you see in this code typical usage of requestAnimationFrame() is to call it from inside the callback itself.
The callback can take an optional parameter a DOMHighResTimestamp which indicates the current time this callback starts to execute, we can use this to calculate how much animation will progress in a frame.
This example illustrates the use of the timestamp parameter:
<script>

            let x = 0;
            let start;
            let animateReq;
            function animate(timestamp) {
                if (start === undefined)
                    start = timestamp;

                const elapsed = timestamp - start;
                // increment x by 2 each iteration
                x += 2;

                // set our object's left property to x
                document.querySelector("#car").style.left = x + "px";


                animateReq = requestAnimationFrame(animate);

                if (elapsed >= 10000) { // Stop the animation after 10 seconds
                    cancelAnimationFrame(animateReq);
                }

            }

            animate();
    </script>
Here i passed the parameter timestamp to animate() callback and then i calculated the elapsed time and use this to stop the animation using another related function which is cancelAnimationFrame(reqId), this function takes the request id returned by requestAnimationFrame().
Easing (Timing) Functions
Easing functions used in a common scale in animation world, these are mathematical functions to specify the rate of parameter change over time. If you want to perform complex animations consider using easing functions. Let’s imagine the previous example where i update the left position of the car over time, in this case the car is moving in fixed speed so in every tick we increment the left position by one (this is known as Linear Easing) but what if we want this position to be updated based on time, for example to speed up the car after some time and to slow it down after some time.
There are a lot of easing types like:
- Linear (constant speed)
- Ease In (start slow, end fast)
- Ease Out (start fast, end slowly)
- Ease In Out (combines ease in and ease out)
- And much more
Let’s update the previous example to implement the EaseIn easing function, in which the object start slow and end fast:
<script>

            var easeIn = (t) => {
                return t * t;
            }

            let x = 1;
            let incrementBy = .01;

            function animate() {

                incrementBy += 0.5;

                 x = easeIn(incrementBy);

                document.querySelector("#car").style.left = x + "px";

                // reset back if
                if (Math.abs(x) >= 1000) {
                    x = 1;
                    incrementBy = .01;
                }


                requestAnimationFrame(animate);

            }

            animate();
    </script>
As you see the easein() function is a simple easing function that increment car speed by multiplying the progress value.
Now let’s add another easing function which is the ease out:
<script>

            var easeIn = (t) => {
                return t * t;
            }

            var easeOut = (t) => {
                return 1 / t;
            }

            let x = 1;
            let incrementBy = .01;

            function animate() {

                incrementBy += .0035;

                 x += easeOut(incrementBy);

                document.querySelector("#car").style.left = x + "px";

                // reset back if
                if (Math.abs(x) >= 1000) {
                    x = 1;
                    incrementBy = .01;
                }


                requestAnimationFrame(animate);

            }

            animate();
    </script>
To compose complex easing functions sometimes it requires good experience in mathematics equations, fortunately there is a website that covers some of those easing functions which easings.net.