Streamlining file management is crucial in modern web applications. A well-designed file manager simplifies how users upload, retrieve, and organize files, minimizing the hassle often associated with file handling. In this article we will build a simple file manager UI with Laravel and Vuejs.
Requirements
- PHP 8.2 or later
- Laravel 11
- Vue 3
- Latest version of Bootstrap and bootstrap icons
Preparing The Project
Let’s install a new laravel 11 project using composer:
composer create-project laravel/laravel laravel_vue_file_manager --prefer-dist
Install npm dependencies:
npm install
npm i bootstrap@5.3.3 bootstrap-icons @popperjs/core --save-dev
This command installs the bootstrap library and popperjs package.
Install the sass package:
npm i sass@1.77.6 --save-exact
Also install Vue 3 and vue vite plugin:
npm install vue@latest
npm i @vitejs/plugin-vue
Rename app.css in resources/css/ to be app.scss and import bootstrap:
@import 'bootstrap/scss/bootstrap';
@import 'bootstrap-icons/font/bootstrap-icons.css';
Import bootstrap in resources/js/bootstrap.js
import * as Popper from '@popperjs/core'
window.Popper = Popper
import 'bootstrap'
Update vite.config.js to include the vue plugin and update app.css to be app.scss:
import { defineConfig } from 'vite';
import laravel from 'laravel-vite-plugin';
import vue from "@vitejs/plugin-vue";

export default defineConfig({
    plugins: [
        laravel({
            input: ['resources/css/app.scss', 'resources/js/app.js'],
            refresh: true,
        }),
        vue()
    ],
});
We need a blade view for our file manager. So rename the welcome.blade.php to be “file_manager.blade.php” and update it as follows:
<!DOCTYPE html>
<html lang="{{ str_replace('_', '-', app()->getLocale()) }}">
    <head>
        <meta charset="utf-8">
        <meta name="viewport" content="width=device-width, initial-scale=1">

        <title>File Manager</title>

        <!-- Fonts -->
        <link rel="preconnect" href="https://fonts.bunny.net">
        <link href="https://fonts.bunny.net/css?family=figtree:400,500,600&display=swap" rel="stylesheet" />

        <!-- Styles / Scripts -->
        @vite('resources/css/app.scss')
    </head>
    <body>
        <div class="container">
            <div id="app"></div>
        </div>

        @vite('resources/js/app.js')
    </body>
</html>
In this view we included the @vite directives and add div#app which bootstraps our Vue app.
The next step is to change the view name in the web.php routes file:
routes/web.php
<?php

use Illuminate\Support\Facades\Route;

Route::get('/', function () {
    return view('file_manager');
});
That’s it. Let’s start creating the vue app
Preparing The Vue App
In resources/js/ directory create app/App.vue. The App.vue component is our starting point
resources/js/app/App.vue
<template>
    <div>
        File Manager
    </div>
</template>

<script setup>

</script>
Then open app.js in resources/js/ directory and add this code:
import './bootstrap';
import {createApp} from "vue";
import App from './app/App.vue';

createApp(App).mount("#app");
This code creates the app view and mounts the <App/> component in #app div. Now build the app using npm run dev and launch the project using php artisan serve. If everything ok you will see “File Manager” message in the browser.
File Manager UI
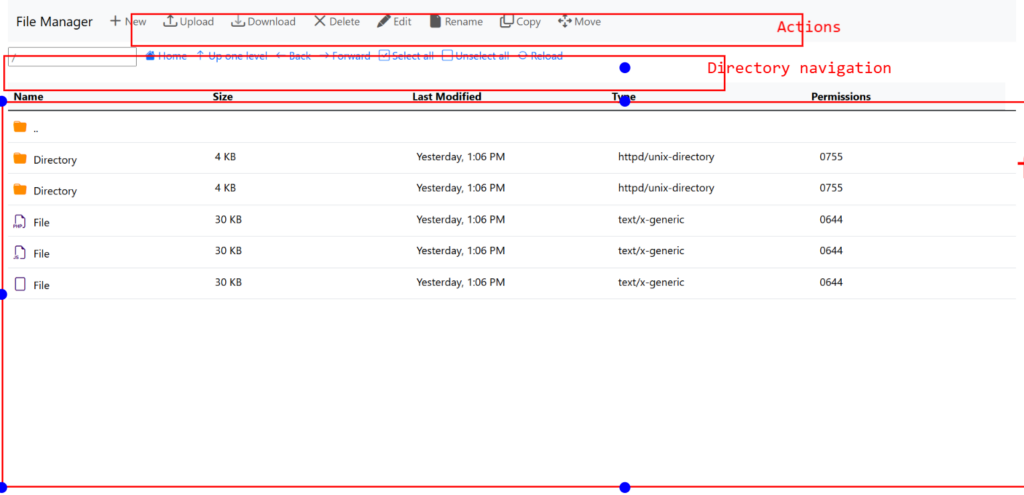
Let’s build a basic UI for our file manager screen using bootstrap and basic css styles. We will need one page and some vue components as shown in this illustration:

As shown in this figure the file manager UI have these components:
- File Actions: The file actions represent actions that can be done on files like creating, copying, deleting, etc.
- Directory Navigation: A set of buttons to move back or forward to specific directory.
- File List: The list of files and directories.
Let’s start by creating the <FileActions /> component:
resources/js/app/components/file-actions.vue
<script setup>

</script>

<template>
    <ul class="navbar-nav controls">
        <li class="nav-item control">
            <a class="nav-link d-flex gap-1 align-items-center" href="#" title="New">
                <i class="bi bi-plus-lg"></i>
                <span>New</span>
            </a>
        </li>
        <li class="nav-item control">
            <a class="nav-link d-flex gap-1 align-items-center" href="#" title="Upload">
                <i class="bi bi-upload"></i>
                <span>Upload</span>
            </a>
        </li>
        <li class="nav-item control">
            <a class="nav-link d-flex gap-1 align-items-center" href="#" title="Download">
                <i class="bi bi-download"></i>
                <span>Download</span>
            </a>
        </li>
        <li class="nav-item control">
            <a class="nav-link d-flex gap-1 align-items-center" href="#" title="Delete">
                <i class="bi bi-x-lg"></i>
                <span>Delete</span>
            </a>
        </li>
        <li class="nav-item control">
            <a class="nav-link d-flex gap-1 align-items-center" href="#" title="Edit">
                <i class="bi bi-pencil-fill"></i>
                <span>Edit</span>
            </a>
        </li>
        <li class="nav-item control">
            <a class="nav-link d-flex gap-1 align-items-center" href="#" title="Rename">
                <i class="bi bi-file-earmark-fill"></i>
                <span>Rename</span>
            </a>
        </li>
        <li class="nav-item control">
            <a class="nav-link d-flex gap-1 align-items-center" href="#" title="Copy">
                <i class="bi bi-copy"></i>
                <span>Copy</span>
            </a>
        </li>
        <li class="nav-item control">
            <a class="nav-link d-flex gap-1 align-items-center" href="#" title="Move">
                <i class="bi bi-arrows-move"></i>
                <span>Move</span>
            </a>
        </li>
    </ul>
</template>
Each file action is list item that contains an <a> tag with a bootstrap icon “bi-” and button label.
Next create the <DirectoryNavigation /> component.
resources/js/app/components/directory-navigation.vue
<script setup>

</script>

<template>
    <div id="navigator" class="d-flex gap-2 pt-2 pb-2">
        <div class="directory-path">
            <form>
                <input type="text" placeholder="/" class="px-1" />
            </form>
        </div>
        <div id="directory-home">
            <a href="#" class="text-decoration-none">
                <i class="bi bi-house-fill mx-1"></i>
                <span>Home</span>
            </a>
        </div>
        <div id="directory-up">
            <a href="#" class="text-decoration-none">
                <i class="bi bi-arrow-up mx-1"></i>
                <span>Up one level</span>
            </a>
        </div>
        <div id="directory-select-all">
            <a href="#" class="text-decoration-none">
                <i class="bi bi-check-square mx-1"></i>
                <span>Select all</span>
            </a>
        </div>
        <div id="directory-unselect-all">
            <a href="#" class="text-decoration-none">
                <i class="bi bi-square mx-1"></i>
                <span>Unselect all</span>
            </a>
        </div>
        <div id="directory-reload">
            <a href="#" class="text-decoration-none">
                <i class="bi bi-arrow-repeat mx-1"></i>
                <span>Reload</span>
            </a>
        </div>
    </div>
</template>
In this code i added a set of buttons to traverse the current directory forward or backward and an input to go to specific directory by specifying directory path.
Finally the <FileList /> component
resources/js/app/components/file-list.vue
<script setup>
    import {ref} from "vue";
    import FileRow from "./file-row.vue";

    const file_list = ref([
        {
            name: '..',
            type: 'directory',
            size: '',
            modified_date: '',
            mime_type: '',
            permission: ''
        },
        {
            name: 'Directory',
            type: 'directory',
            size: '4 KB',
            modified_date: 'Yesterday, 1:06 PM',
            mime_type: 'httpd/unix-directory',
            permission: '0755'
        },
        {
            name: 'Directory',
            type: 'directory',
            size: '4 KB',
            modified_date: 'Yesterday, 1:06 PM',
            mime_type: 'httpd/unix-directory',
            permission: '0755'
        },
        {
            name: 'File',
            type: 'file-php',
            size: '30 KB',
            modified_date: 'Yesterday, 1:06 PM',
            mime_type: 'text/x-generic',
            permission: '0644'
        },
        {
            name: 'File',
            type: 'file-js',
            size: '30 KB',
            modified_date: 'Yesterday, 1:06 PM',
            mime_type: 'text/x-generic',
            permission: '0644'
        },
        {
            name: 'File',
            type: 'file-generic',
            size: '30 KB',
            modified_date: 'Yesterday, 1:06 PM',
            mime_type: 'text/x-generic',
            permission: '0644'
        }
    ]);
</script>

<template>
    <div id="file-list" class="mt-3">
        <table class="table table-hover">
            <thead class="table-light">
                <tr>
                    <th>Name</th>
                    <th>Size</th>
                    <th>Last Modified</th>
                    <th>Type</th>
                    <th>Permissions</th>
                </tr>
            </thead>
            <tbody class="table-group-divider">

                <FileRow v-for="(file_item, index) in file_list" :key="index" :fileItem="file_item" />

            </tbody>
        </table>
    </div>
</template>
The <FileList /> component renders the file list in a tabular format. Typically the file list will be fetched from backend using PHP file functions, however for now i added some dummy file list data stored in a ref variable file_list which is an array initially. In the template we iterate over this file_list and display a single row component <FileRow />
resources/js/app/components/file-row.vue
<script setup>
    const props = defineProps({
       fileItem: {
           type: Object
       }
    });

    const getFileClass = () => {
        switch (props.fileItem.type) {
            case 'directory':
                return 'file-type-directory bi-folder-fill';
            case 'file-image':
                return 'file-type-file bi-image';
            case 'file-php':
                return 'file-type-file bi-filetype-php';
            case 'file-txt':
                return 'file-type-file bi-filetype-txt';
            case 'file-js':
                return 'file-type-file bi-filetype-js';
            case 'file-css':
                return 'file-type-file bi-filetype-css';
            default:
                return 'file-type-file bi-file';
        }
    }
</script>

<template>
    <tr class="file-row">
        <td>
            <div class="file-name">
                <i class="bi file-icon " :class="getFileClass()"></i>
                <span>{{fileItem.name}}</span>
            </div>
        </td>
        <td>
            <span>{{fileItem.size}}</span>
        </td>
        <td>
            <span>{{fileItem.modified_date}}</span>
        </td>
        <td>
            {{fileItem.mime_type}}
        </td>
        <td>
            <span>{{fileItem.permission}}</span>
        </td>
    </tr>
</template>
The <FileRow /> component expecting a fileItem prop which is an object that contains a single file info like name, size, type, etc. Next in the template we display a <tr> tag with the file info. The getFileClass() method should recoginize and return a css class for the relevant icon to display for the directory or file type.
Now let’s combine these components together in the <App /> component:
App.vue
<template>
    <div id="file-manager">
        <nav class="navbar navbar-expand-lg bg-body-tertiary">
            <div class="container-fluid">
                <a class="navbar-brand" href="#">File Manager</a>
                <button class="navbar-toggler" type="button" data-bs-toggle="collapse" data-bs-target="#navbarNav" aria-controls="navbarNav" aria-expanded="false" aria-label="Toggle navigation">
                    <span class="navbar-toggler-icon"></span>
                </button>
                <div class="collapse navbar-collapse" id="navbarNav">
                    <FileActions />
                </div>
            </div>
        </nav>

        <DirectoryNavigation />

        <FileList />
    </div>
</template>

<script setup>
import FileActions from "./components/file-actions.vue";
import DirectoryNavigation from "./components/directory-navigation.vue";
import FileList from "./components/file-list.vue";
</script>
The last step is to add some basic css styles in app.scss
resources/css/app.scss
@import 'bootstrap/scss/bootstrap';
@import 'bootstrap-icons/font/bootstrap-icons.css';

#file-manager {
    .controls {
        gap: 10px;
    }

    .controls .control i.bi::before {
        font-size: 20px;
        font-weight: 700 !important;
        line-height: unset;
    }

    #file-list {
         table {
            width: 100%;

             tbody {
                 height: 500px;
                 overflow-y: auto;
                 display: block;
             }
        }

        table thead, table tbody tr {
            display: table;
            width: 100%;
            table-layout: fixed;
        }

         table thead {
            width: calc( 100% - 1em )
        }

        .file-row {
            .file-name {
                cursor: pointer;
            }

            .file-name .file-icon {
                margin-inline-end: 10px;
                font-size: 20px;
            }

            .file-name .file-icon.file-type-directory {
                color: darkorange;
            }

            .file-name .file-icon.file-type-file {
                color: #3a066d;
            }
        }
    }

    .bg-primary td {
        --bs-bg-opacity: 1;
        background-color: rgba(var(--bs-primary-rgb), var(--bs-bg-opacity)) !important;
        color: #fff;

        .file-icon.file-type-file {
            color: #fff !important;
        }
    }
}

.disabled {
    cursor: not-allowed;
    color: gray;
}
Now you can preview this UI, so in the terminal run:
npm run dev
next run
php artisan serve
Uploads Start Directory
The file manager reads the files list from an uploads directory, this directory should be located in your app public/ path like public/uploads/. So create this directory inside public dir and set an environment variable UPLOADS_DIR in the .env file like so:
UPLOADS_DIR=uploads/
VITE_UPLOADS_DIR="${UPLOADS_DIR}"
Next update directory-navigation.vue component to display the current directory in the input file:
directory-navigation.vue
<script setup>
    import {ref} from "vue";

    const navigation_dir = ref(import.meta.env.VITE_UPLOADS_DIR);

    const navigate = () => {
    }
</script>

<template>
   ....
   ....

   <form @submit.prevent="navigate">
                <input type="text" placeholder="/" class="px-1" v-model="navigation_dir" />
            </form>
</template>


