In this blog post we will look at paypal smart buttons and how to do payments in paypal using these buttons without using any use of restful apis.
Most people depend on paypal when handling payments as it provides a rich support for different kinds of payments internationally. Recently developers tend to use paypal rest api to do payments which i will cover in another tutorial, but there is another way in paypal which is smart buttons which is a set of buttons enabled and used through javascript.
Working with paypal smart buttons is the same as rest api. At first we inject the buttons into a container element, the function that create the buttons accept an object which holds the item or product details, then we call different callbacks which is triggered on payment cycle like approving or cancelling the payment.
Paypal Account
At first you must have paypal account if not create a new account in https://paypal.com. After creating the account go to paypal developer dashboard and create a sandbox account (testing account) which is used to simulate payment functionality, we will use this account to make payment later.
Paypal Javascript SDK
To use paypal smart buttons in your web application first add the javascript sdk:
<!DOCTYPE html>
<html>
<head>
	<meta charset="utf-8" />
	<title>smart paypal buttons</title>
	<meta name="viewport" content="width=device-width, initial-scale=1">
  	<meta http-equiv="X-UA-Compatible" content="IE=edge" />
</head>
<body>

	<script src="https://www.paypal.com/sdk/js?client-id=sb"></script>
</body>
</html>
In the above note the client-id parameter we passed, this is important and represent the token of the application you need to create so that paypal can identifies that the payment is directed to your account.
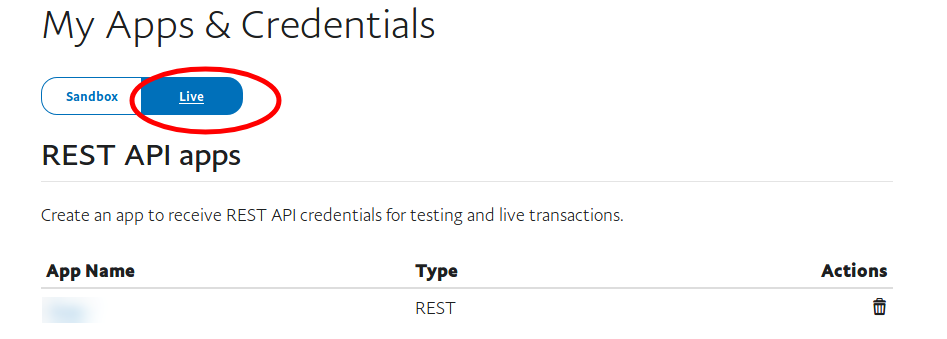
in sandbox mode you can either pass “sb” or a client id which you can get when creating a new application from developer dashboard. Note that when testing payments you need to make a sandbox application. Later on production you can toggle this application to live as illustrated in this screen:

Rendering the buttons
To render the buttons a call to paypal.Buttons().render(container element). The render function accepts a selector which is a container element to render buttons in.
<!DOCTYPE html>
<html>
<head>
	<meta charset="utf-8" />
	<title>smart paypal buttons</title>
	<meta name="viewport" content="width=device-width, initial-scale=1">
  	<meta http-equiv="X-UA-Compatible" content="IE=edge" />
</head>
<body>

	<div id="payment-buttons"></div>

	<script src="https://www.paypal.com/sdk/js?client-id=sb"></script>
        <script>
            paypal.Buttons().render('#payment-buttons');
        </script>
</body>
</html>
Now run the above code you will the paypal buttons, by default it displays two buttons which is paypal to open paypal payment dialog and credit/debit card button to enable user to pay with credit card.
Sending product details and processing payments
In the above code the paypal.Buttons() function accept an object which you can customize to process payments. The first thing is the createOrder() callback function which calls the paypal orders Api internally. This callback responsible for sending product details like price, currency to the orders Api.
<!DOCTYPE html>
<html>
<head>
	<meta charset="utf-8" />
	<title>smart paypal buttons</title>
	<meta name="viewport" content="width=device-width, initial-scale=1">
  	<meta http-equiv="X-UA-Compatible" content="IE=edge" />
</head>
<body>

	<div id="payment-buttons"></div>

	<script src="https://www.paypal.com/sdk/js?client-id=sb"></script>
        <script>
            paypal.Buttons({
                 createOrder: function(data, actions) {
				return actions.order.create({
					purchase_units: [
						{
							amount: {
								currency_code: "USD",
								value: "3.87"
							}
						}
					]
				});
			}
            }).render('#payment-buttons');
        </script>
</body>
</html>
As you see the createOrder() callback return another callback using actions.order.create. The create() function takes an object, in the above code i passed the purchase_units which include the currency and the price. To view all the available options you can pass to create() look at the orders Api docs.
Approving payments
On successful approval on the payment paypal internally calls the onApprove() callback which you can use to for example show a success message, update the database and so on.
<!DOCTYPE html>
<html>
<head>
	<meta charset="utf-8" />
	<title>smart paypal buttons</title>
	<meta name="viewport" content="width=device-width, initial-scale=1">
  	<meta http-equiv="X-UA-Compatible" content="IE=edge" />
</head>
<body>

	<div id="payment-buttons"></div>

	<script src="https://www.paypal.com/sdk/js?client-id=sb"></script>
        <script>
            paypal.Buttons({
                 createOrder: function(data, actions) {
				return actions.order.create({
					purchase_units: [
						{
							amount: {
								currency_code: "USD",
								value: "3.87"
							}
						}
					]
				});
			},
                        onApprove: function(data, actions) {
				return actions.order.capture().then(function(details) {
					 alert('Congratulations! payment success');
					 console.log(details);
					 console.log(details.id);  // order id
					 console.log(details.status);  // 'COMPLETED'

                                         // send ajax request to update the db
				});
			}
            }).render('#payment-buttons');
        </script>
</body>
</html>
The onApprove() callback return another callback actions.order.capture() or actions.order.authorize(), the first used to capture payment immediately which is suitable in most situations , the later used to authorize the payment and capture it in later time.
In the above example i used capture() to capture payment immediately, then showed alert message of transaction success, console.log() to view the incoming response details, you can also update the database for the completion of the transaction.
Cancelling payments
To handle cancellation another callback triggered which is onCancel(), this usually happen when clicking the bottom cancel link on paypal dialog:
<!DOCTYPE html>
<html>
<head>
	<meta charset="utf-8" />
	<title>smart paypal buttons</title>
	<meta name="viewport" content="width=device-width, initial-scale=1">
  	<meta http-equiv="X-UA-Compatible" content="IE=edge" />
</head>
<body>

	<div id="payment-buttons"></div>

	<script src="https://www.paypal.com/sdk/js?client-id=sb"></script>
        <script>
            paypal.Buttons({
                 createOrder: function(data, actions) {
				return actions.order.create({
					purchase_units: [
						{
							amount: {
								currency_code: "USD",
								value: "3.87"
							}
						}
					]
				});
			},
                        onApprove: function(data, actions) {
				return actions.order.capture().then(function(details) {
					 alert('Congratulations! payment success');
					 console.log(details);
					 console.log(details.id);  // order id
					 console.log(details.status);  // 'COMPLETED'

                                         // send ajax request to update the db
				});
			},
                        onCancel: function (data) {
				alert('Payment cancelled');
	  		}
            }).render('#payment-buttons');
        </script>
</body>
</html>
Payment errors
If an error happens during checkout process the onError() callback triggered. This is a better place to show custom error message:
<!DOCTYPE html>
<html>
<head>
	<meta charset="utf-8" />
	<title>smart paypal buttons</title>
	<meta name="viewport" content="width=device-width, initial-scale=1">
  	<meta http-equiv="X-UA-Compatible" content="IE=edge" />
</head>
<body>

	<div id="payment-buttons"></div>

	<script src="https://www.paypal.com/sdk/js?client-id=sb"></script>
        <script>
            paypal.Buttons({
                 createOrder: function(data, actions) {
				return actions.order.create({
					purchase_units: [
						{
							amount: {
								currency_code: "USD",
								value: "3.87"
							}
						}
					]
				});
			},
                        onApprove: function(data, actions) {
				return actions.order.capture().then(function(details) {
					 alert('Congratulations! payment success');
					 console.log(details);
					 console.log(details.id);  // order id
					 console.log(details.status);  // 'COMPLETED'

                                         // send ajax request to update the db
				});
			},
                        onCancel: function (data) {
				alert('Payment cancelled');
	  		},
	  		onError: function (err) {
	  			alert(err);
  			}
            }).render('#payment-buttons');
        </script>
</body>
</html>
Launch into production
To use paypal into production environment you have to create paypal business account. Go to https://paypal.com then click Signup then select Business Account then complete the steps.
- Replace sandbox credentials with live credentials
<script
    src="https://www.paypal.com/sdk/js?client-id=LIVE_CLIENT_ID">
  </script>
You can get Live Client Id by going into developer dashboard as described above and toggle sandbox to live or create a new production application.